Here is a collection of useful information and tips about working with the projectors. More detailed information for lab members is here.
Safety
- Keep lens caps on when not in use, to protect the lens, but:
- Take lens cap off when in use! (they can melt)
- Never look into the lens when in use (danger of eye damage)
- Keep the polaroids at least 20cm from the lens (danger of heat damage)
- When operating, ensure there is adequate ventilation: 50cm to both left and right of each projector, 20cm above it and 100cm behind it. Never cover the projector when in use.
- The operating temperature range is 5-35oC. Unfortunately the lab, being a small windowless room, can get hot with two large projectors plus the computers. There is a digital thermometer on the back wall of the lab to help monitor the lab temperature. Currently (Jan 2007) the lab temperature is 25oC when all the equipment has been off overnight, rising to 31oC during experiments.
Turning on/off
- Remove the lens cap.
- Press the switch at the back on the projector to “on”. Wait a few seconds until both the green and red lights on the top of the projector come on.
- Press the pink power button on top of the projector twice to turn the projector on. The fan is audible almost immediately; the beam takes up to 30s to appear after fan starts. You’ll then see a blue screen with the “Christie” logo, counting down to 0, after which the display from the computer should appear.
- Once the projector is on, wait at least 5 minutes before turning it off; shorter periods can damage the bulb.
- If power management mode is on, then the projector will power down if it does not receive any input signal for 5 minutes. If you want to disable this, hit menu, then right-arrow until you get to the “settings” menu, then down until you get to the light-bulb icon, then “select”, then press an arrow key to toggle from “on” to “off”.
- To turn off the projector, press the pink power button twice.
- After turning the projector off, you have to wait 90s before you can turn it back on.
Lens shift
Be careful about using the lens shift. If you keep pressing the button so as to move the projector to the end of its range, I’ve found it tends to jam, and then won’t respond to any command. So far I’ve been able to fix this by removing the front of the projector, which seems to restore its freedom of movement, but it doesn’t seem a very good idea to do this on a regular basis. So try not to get it into this position — avoid extreme lens shifts.
Blue screen
Sometimes, I find that when you switch the bottom (M2000046) projector on, the image fails to display and you just get a blue screen. To fix this, reboot the projector by inserting a biro (or similar) into the “reset” hole in its control panel.
Set-up and maintenance
Serial numbers
The projectors are two identical Matrix 2500 machines from Christie Digital, serial numbers M2000046 and M200049. The serial numbers are given on a small white sticker on the left hand side of the projector, as you look at it from the front. M2000049 is the top projector, M2000046 the bottom. They are both under warranty until 24th Jan 2009.
Service menu
You can get to the service menu by holding down the Menu and Image buttons on top of the projector simultaneously for 5 seconds. The service menu then appears on the screen. Be careful not to press anything else at this point, or you might scramble the settings. To exit the service menu, press the pink power button on top of the projector. The projector will then ask you, as usual, “Power off?” — if you want to leave it on, just wait for this to go away; if you want to power it down, press the pink button again.
As of Jan 2007, the service menu setting read:
| Service Mode | CHRISTIE | |
| Input 2 | ||
| Group | No | Data |
| 0 | 0 | 26 |
Installing the lens
There are instructions on how to do this here.
Changing the lamps
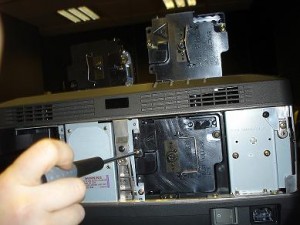
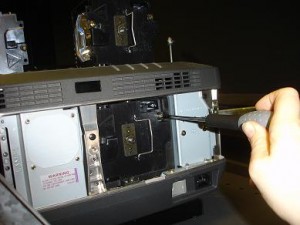
The instructions in the manual are pretty straightforward. Wait at least 45 minutes for the projector to cool, then pull out the AC supply. Remove the back panel by unscrewing the three black screws (you don’t need to unscrew them all the way, which is handy for avoiding losing them). The two lamps are the black units on either side. Unscrew the two brass screws holding this in place, as shown below (again, you don’t need to unscrew them all the way), and pull the lamp assembly out using the wire hook on the back. When you replace the back panel, you have to screw it on tightly, otherwise the power supply will not work.
Meaning of warning lights
Jan 2007: Encountered a problem with projector M2000046 . For a few seconds after I hit the pink power button, it appears to fire up as normal, but then the fan cuts out, and the green “ready” light and the red “warning temp” light flash on and off together. The manual indicates than “warning temp” light means the temperature is too high, and suggests cleaning the filters. However, according to Christie Technical Support, only a steady “warning temp” light indicates excessive temperature. A flashing light could mean any out of 30 or so things. One possibility, apparently, is that the lamp has failed (naively I had assumed that in that case the yellow “replace lamp” light would come on).
Getting the computer to talk to the projectors
I initially found it a little tricky getting the computer to talk to the projectors. I am using the DVI input on input 1 (top panel) of the projectors. If you are using a computer with a 15 pin HDD (VGA) video output, then you need to use a VGA-VGA cable with a 15-pin connector at each end, and use the VGA-DVI adaptor that came with the projectors to plug that into the DVI input. NB VGA is an analogue format, so you have to tell the projectors to expect an analogue signal on their DVI inputs. To do this, hit menu, and then “select” because the cursor will already be on “input 1”. This will then bring up a sub-menu saying “digital” and “analog”. Press the down arrow to move the cursor to “analog” and then hit “select” (and then “menu” to remove the menu from the screen).
My Dell came with a Y-connector which plugs into the Dell’s 59-pin DMS video output, and then branches into two 15-pin VGA outputs. I used these to drive the two projectors. When I first tried, I would boot up the Dell with the projectors connected in this way, and it would all seem fine; I’d see the Windows start-up sequence on the projector screen. But then when Windows came up fully, the projectors would suddenly lose the signal and I’d just get a blank screen (blue field). Then I updated the drivers for the NVidia graphics card, and suddenly everything worked.
Next, I bought a “DMS to dual DVI” Y-connector which plugs into the 59-pin DMS output of the Dell, and then branches into two DVI outputs. That meant I could then plug these outputs straight into the projector with a DVI-DVI cable. This requires setting the projectors back to expecting a digital video input (see instructions above on changing from digital to analogue). I thought this would be better on the grounds that fewer converters and connections means less error, and that a digital video input would be better. However, when I rebooted the computer with these connected, I had the same symptoms as before — namely the Windows start-up sequence appeared on the projector screens, but when Windows came up fully, they lost the signal. I had the projector menu up in “auto detect” mode, and I could see the reading suddenly change from “D-SXGA1” to “—” (no signal). After scratching my head for a bit, I found a solution. I connected the CRT monitors back, so I could see the video output, and fired up “Control Panel -> Display -> Settings -> Advanced” to get the NVidia graphics card software. I moved the mouse cursor over the “detect displays” button, and then swapped the video output over to the projectors (which still showed blue screens). Then I clicked the mouse button, activating “detect displays”. I don’t know what this did, but after a second or two, the Windows desktop shimmered into life on my projector screen. Apparently “detect displays” resets the display mode to “single monitor”, but I just changed it to “span mode” and then the Windows desktop was spread over both projector outputs, exactly as required. Having done this once, the projectors are still able to display the signal when the system has rebooted.
June 4th 2007: Today we had this problem again, but “detect displays” did not help. Eventually Graeme figured out we needed to reboot the bottom projector. NB an additional concern was that after swapping the dual-DVI video output over to the monitors (now two LCD monitors), we needed to reboot the computer before getting any signal on the monitors. This made us wonder if something was wrong with the output from the graphics card. However, my recollection is that I experienced the same thing before — you can’t always “hot-swap” the dual-DVI output between the projectors and CRT/LCD monitors; you may need to reboot.


